StarEFX Modular Bioguard Starlight Panel

Details and specifications
The StarEFX Bio Panel is designed for medical settings where higher hygiene and safety standards are paramount. Utilizing the Armstrong Bioguard panel, the STAREFX-MOD-BIO 1206 combines medical-grade quality with the enchanting aesthetics of starry lighting. Easily mounted onto suspended ceilings, these panels enhance the visual appeal of the space with their white shimmering light and offer the flexibility of colour changes through an optional controller, enriching any environment with a dazzling starlight display.
The installation of these modular panels is streamlined through a low-voltage cable, allowing for a daisy chain setup that can support up to 24 panels from a single power source. In standalone mode, the StarEFX Bio Panel captivates with a spontaneous arrangement of white, twinkling fibre optic stars, bringing a touch of the celestial into healthcare environments. For those desiring a splash of colour, the optional wireless controller unlocks a spectrum of hues.

Width and length

Thickness
Applications and use
The panels seamlessly integrate into A24 suspended grid systems, making them versatile not only in installation but also in application. The luminous display serves as a powerful tool to ease patient anxiety during consultations and treatments. They are highly versatile and can be used to create a serene and peaceful atmosphere ensuring a tranquil environment that supports patient experiences.
This type of panel is ideal for creating a focal point for patients during consultation or treatments.
Treatment Rooms | Imaging Rooms | Patient Recovery Room | De-escalation Rooms | Assisted Living
Panel Colours
Bioguard panels are available in white only.
Operation
Every StarEFX Bio Panel is outfitted with its own starlight module, complete with pre-installed fibre optics, ready to illuminate your space right out of the box.
To power up, you'll need a standard 10Amp GPO for the 12V power supply, which energizes the first panel in the series. To expand your star sensory, each panel includes a power link cable, facilitating a seamless daisy chain connection to additional panels. Whether you're operating in the standalone mode or taking advantage of the customizable options in controller mode, you can connect up to 24 panels to a single power supply.
Standalone mode - White colour stars starry effect
The panels operate in a simple on/off mode that displays beautiful shimmering white lights. To turn on or off the starlights, you will need to use a wall switch in addition to the power supply. This allows for convenient and easy control of the starlights.
StarEFX modular Bioguard

%20-%20AdobeStock_323634490.png?width=110&height=109&name=GPO%20AUST%20(243x243)%20-%20AdobeStock_323634490.png "Power outlet")
240V / 10Amp power outlet
%20-%20AdobeStock_323634490.png?width=110&height=179&name=GPO%20Wall%20switches%20(148x240)%20-%20AdobeStock_323634490.png "Wall switch")
Wall mount switch
Coloured stars starry effect - Controller module (optional)
Controller mode (optional)
When you connect the controller module, it allows you to select different colours and choose from two program modes. This RF wireless remote also enables you to turn the power on and off. Additionally, for added convenience, you can install a wall switch that will turn the starlights on and off.
Program settings
1. White (WH) with shimmer effect
2. Blue (BLU) with shimmer effect
3. VT, YL, GN, BLU, WH (Pauses on colour for 8 sec, with a 5-sec transition into next colour) with shimmer effect
4.VT, YL, GN, BLU, WH (Pauses on colour for 20 sec, with a 10-sec transition into next colour) with shimmer effect
5. Green (GN) with shimmer effect
6. Yellow (YL) with shimmer effect
7. Violet (VT)with shimmer effect
StarEFX modular Bioguard
240V / 10Amp power outlet
Wall mount switch
.jpg?width=210&height=165&name=Controller-%26-remote-(1280x1003).jpg "Controller and wireless remote")
Controller module
Components and part numbers
The standalone system of 'white colour starlights', requires only the power supply along with the StarEFX panels to be ordered. In this configuration, one power supply can easily power up to 24 panels, providing you with an efficient standalone setup. However, for colour-changing starlights, the optional controller module is required. This will enable you to enjoy the benefits of a more versatile and dynamic lighting system.
Each panel comes with the fibre optic stars pre-loaded into the panel.
*Note: LightEFX does not supply power outlets or wall switches.
.png?width=270&height=75&name=power-link-cable-(900x250).png "Power Link Cable")
Part No: PS-12V-CABLE
Voltage: 12V
Current: 5A
Lead length: 1500mm
Connection: 5.5x2.1mm plug both ends
(Supplied with each panel)
Part No: STAREFX-MOD-BIO 1206
Panel size: 1200Lx600Wx19H (mm) | 47.244"Lx23.622"Wx0.748"H
Panel weight: 2.0kg | 4.40lbs
Power Consumption: 40mW
Input Voltage: 12V
Light Source: LED
Standalone mode colours: White
Controller mode colours: White, Blue, Green, Yellow, Violet
Effect: Shimmer/twinkle
Fibre Qty: 28
ACCESSORIES
.jpg?width=172&height=179&name=PS-12VDC-2A-INTL%20W_Aus%20plug%20(1280x1329).jpg "12V power supply")

.jpg?width=203&height=179&name=Modular%20panel%20controller%20(1280x1126).jpg "Controller")
.jpg?width=228&height=179&name=Controller-%26-remote-(1280x1003).jpg "Controller and wireless remote")
Part No: PS-12VDC-2A
Voltage: 12V
Current: 2A
Lead length: 1500mm
Connection: 5.5x2.1mm plug
(This item does not come with the panel, it is purchased separately)
Part No: FOC-REMRC04-433
Size: 92x40x15mm | 3.62"x1.58"x0.6"
Colour: White
Part No: FOC-MOD-CTLR
Size: 96x41x20mm | 3.78"x1.61"x0.78"
Radiofrequency: 433Mhz
Colour: Black
FOC-MOD-CTLR/RM04
Comes with the wireless remote
Input voltage: 12V
Current: 20mA
Wattage: 0.25W
Output voltage: 12v signal 2A Max
Lead length: 1500mm
Connection power: 5.5x2.1mm plug
Connection to daisy link: 5.5x2.1mm socket
Connects up to 24 panels
(This item does not come with the panel, it is purchased separately)
Packaging details
Packaging - Single
Dimensions - 1290Lx625Wx42H (mm) | 50.78"Lx24.60"Wx1.65"H
Weight - 2.3kg | 5.07lbs
Volume - 0.0339m3 | 1.196ft3
Install requirements
- Philips screwdriver
- Ladder
- Measuring tape
- Pencil
- Gloves
- Safety glasses
- Respirator mask
- 240v/110v 10Amp General Power Outlet (GPO) above the ceiling (installed by a licensed electrician)
- Hole cut out in plaster for the power supply - 65mm (2-1/2")
- Wall switch (installed by a licensed electrician)
- 2 person install
Preparation
Assess the Installation Area: Ensure the suspended grid ceiling is clean, secure, and capable of supporting the panels. Plan the layout according to your design preferences.
Installation:
1. Determine the panel’s orientation to be mounted onto the ceiling.
2. Install power outlet and wall switch
3. Plug the power supply into the power outlet
- Leave approx. 1 metre of the 12v power cable suspended from the ceiling allowing accessibility.
4. Install the StarEFX panel
Installation quick guide
Power Supply Setup:
Identify the location for the power supply near a power outlet. The 12V power supply should be accessible for maintenance and close enough to connect to the first panel.
Install First Panel:
- Locate the first-panel position in the grid closest to the power supply.
- Place the StarEFX Bio Panel into the grid, ensuring it sits securely on the grid frame.
- Connect the panel to the 12V power supply.
Daisy Chain Additional Panels:
- Use the power link cables provided with each panel to connect the first panel to the second, and so forth, in a daisy chain configuration.
- Continue placing and connecting panels according to your planned layout, ensuring each fits
securely within the grid system.
Controller Module (Optional): If using the controller for colour and effect variations, connect the power supply to the controller with the power link cable connecting from the controller to the first panel.
Testing:
- Power On and Test: Power on the system once all panels are installed and connected. Test each panel for proper operation, including any colour or effect changes if using the controller module.

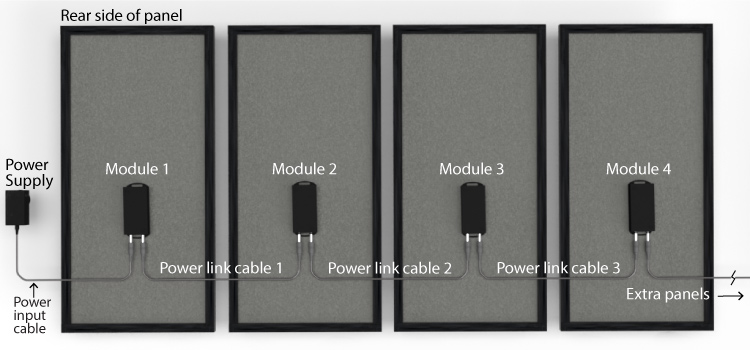
Wire connection guide - Standalone mode
The power supply cable with the DC connector plugs into one of the DC connections from the first panel, with the other cable plugging into the second panel creating a daisy chain link.
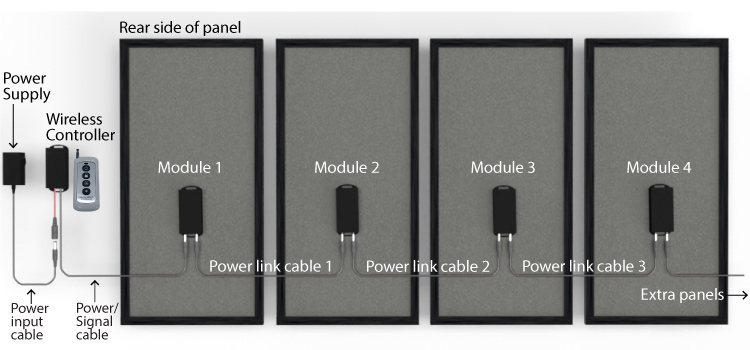
Wire connection guide - Controller mode
The power supply cable with the DC connector plugs into the controller module first, with the DC cable from the control module plugging into one of the DC connections from the first panel, with the other cable plugging into the second panel creating a daisy chain link.
Standalone configuration

Controller mode configuration

For a quote or design requirements > Click here!