StarEFX™ Timber Slat panels
The Symphony of Sound and Light!

An elegant timber panel complements the StarEFX™ product range, seamlessly blending superior acoustic performance with mesmerizing star lighting. Ideal for elevating the ambiance in residential and commercial spaces, this panel offers enhanced sound quality and introduces a celestial experience through its integrated StarEFX™ Module.
The StarEFX™ Acoustic Slat Panel provides multiple acoustic benefits thanks to its sound-absorbing polyester backing and veneer slats that scatter sound waves in various directions. What sets this panel apart is the StarEFX™ LED Module, which connects one panel to the next in a daisy chain setup. These LED Modules not only twinkle and shine in white but can also change colors with an optional module controller, adding a dynamic visual element to any room.
Step into a realm of acoustic clarity and starlit beauty. The epitome of sensory elegance!

The panel measures 2720x600x21mm and consists of two distinct layers. The first layer is a sound-absorbing polyester backing, and the second layer features veneered lamella strips on MDF board. Each panel is embedded with 70 fiber optic star points arranged in a random pattern. These star points are efficiently powered by a single power supply accommodating up to 24 panels.
When it comes to installation, the StarEFX Acoustic Slat Panel requires a special approach. Due to the inclusion of the StarEFX module, the panel cannot be mounted directly onto the wall. Instead, the wall must be fitted with battens to create a gap between the wall and the rear of the panel. This gap accommodates the fiber optics and power link cable used in the daisy chain setup.
Colour selection

Panel specifications
Each StarEFX Slat Panel is designed with dimensions of 2720mm x 600mm and features lamellas that are 12mm deep and 26mm wide, spaced 14mm apart. These slats are affixed to a 9mm thick acoustic polyester felt base. To accommodate the fiber optics and module, the panel is framed by 14mm wide polyester strips on the rear side for an overall panel thickness of 30mm.
The acoustic felt backing carries a class A fire rating certification ASTM E84-16.

Installation
Before you begin cutting your StarEFX Slat Panel, it's crucial to relocate any fibers in the cutting area. Drill a 1mm hole in the new position, cut the fiber from its current location, and insert it into the new hole. Secure the fiber with epoxy adhesive, avoiding super glue or similar adhesives, as they can damage the fiber.
To cut the acoustic panel, tape the area with regular masking tape and position the slats 50mm inside the intended saw cut before screwing or stapling them. Using a fine-toothed hand or circular saw with a guide rail for cutting veneer slats is best.
After cutting, carefully sand the edges using fine-grain sandpaper. The polyester fabric of the acoustic panel is easily cut with a sharp blade.
Consider applying a protective finish like wood oil to the veneer slats. This enhances the panel's natural look and offers protection against dust buildup. A simple wipe-down with a dry cloth will suffice if you prefer to keep the panels without a finish.

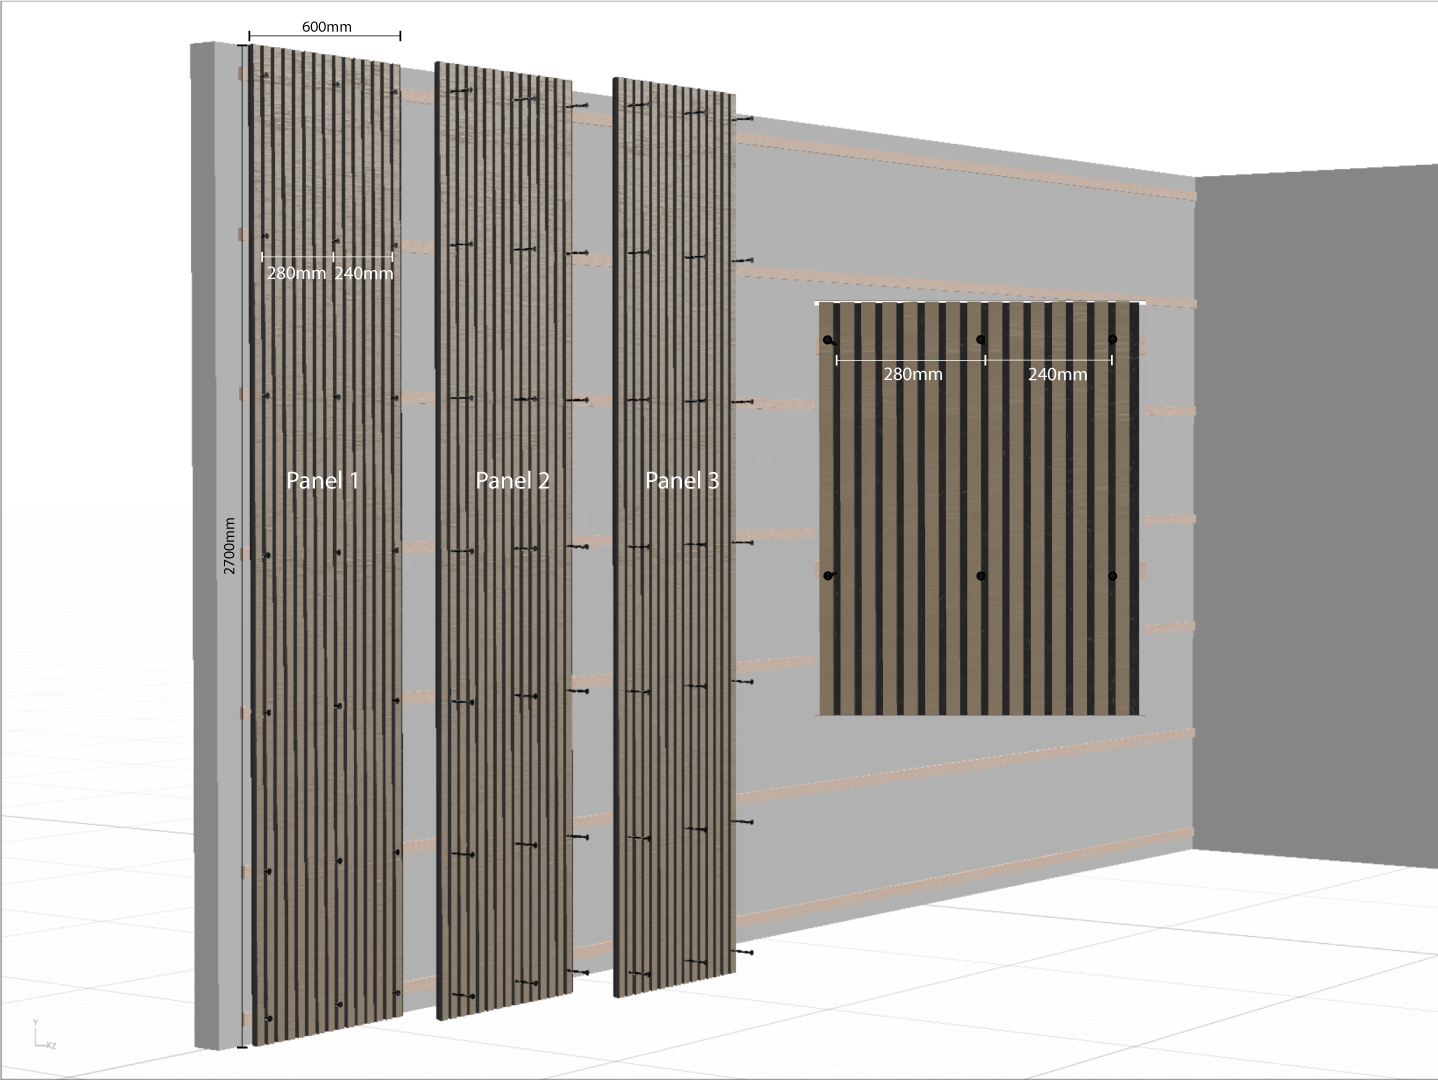
A recommendation, using a minimum of 21 screws per panel at 280mm (11.02") intervals across and 426mm (16.77") intervals down the length of the panel.
1. Screwing the panels into timber battens:
For optimal sound acoustics, assemble a frame with 45mm timber battens onto the wall and screw the slat panels directly into the battens through the acoustic felt.
For Class A sound absorption, it is recommended to use insulation bats between the slat panel and wall in addition to this method.
Power Outlet - Ensure you have a standard 240V, 10Amp power outlet ready for the 12V power supply. Consider adding a wall switch for convenient power control.
Batten Spacings - To ensure the panels remain stable and minimize flexing, we recommend batten spacing between 400mm and 450mm. This small adjustment makes a big difference in maintaining the sleek look of your panels.
Click images to enlarge
Power and Module Connection - White Starlight
This section explains how to connect your panels for a simple white starlight display without using the wireless controller.
Plug the 12V Power Supply into your wall outlet.
Connect the cord from the power supply directly to the module located on the back of your first panel.
To extend your starlight setup, use the power link cable to connect from the module on Panel 1 to the module on Panel 2. This allows you to daisy-chain your panels.
Click images to enlarge
Power and Module Connection - Colour Starlights
This section explains how to connect your panels with the wireless controller option for coloured starlight display.
Plug the 12V Power Supply into your wall outlet.
Connect the power supply cord to the wireless controller. Then, connect the power link cable from the controller to the module on your first panel.
To extend your starlight setup, use the power link cable to connect from the module on Panel 1 to the module on Panel 2. This allows you to daisy-chain your panels.
Click images to enlarge
Acoustic Properties
Laboratory measurements of sound absorption coefficient were carried out in a reverberation room according to the test method of EN ISO 354:2003.
Slat panel mounted onto battens:
Panel mounted with 45mm timber battens spacing and insulation.

Slat panels mounted on insulated frame:
Panels mounted on joists with 100mm spacing from the wall and filled with insulation for an absorption coefficient of 0.95 (MH).

Colour Range
Teak No. 3 | SKU: STAREFX-SLAT 03TK/27


Walnut No. 4 | SKU: STAREFX-SLAT 04WT/27


Smoked Oak No. 5 | SKU: STAREFX-SLAT 05SO/27


Teak No. 6 | SKU: STAREFX-SLAT 06TK/27


Wenge No. 7 SKU: STAREFX-SLAT 07WG/27


Grey Oak No. 8 | SKU: STAREFX-SLAT 08GY/27


Black Oak No. 9 | SKU: STAREFX-SLAT 09BO/27


Oak No. 10 | SKU: STAREFX-SLAT 10OK/27


Black Walnut No. 11 | SKU: STAREFX-SLAT 11BW/27


