501DMX Illuminator
User Manual
Safety Instructions
- Read the entire manual before connecting the illuminator to a power source.
- Installation completed by a licensed electrician.
- Keep out of wet areas.
- Do NOT operate when the ambient temperature exceeds 40ºC.
- All servicing is to be carried out by an authorised service agent.
Index:
1. Technical Data
2. Installation
3. Communication
3a. DMX512
3b. Wireless Remote
3c. Standalone
4. Communication Wiring
5. Harness Installation
6. Maintenance
7. Troubleshooting
.png)
1. Technical Data
| Voltage: | 12VDC |
| Amp draw: | 0.50 |
| Power: | 6 watts |
| Light source: | 5 watts LED |
| Colour temperature: | 6000ºK (other colour temperature available) |
| LED lifespan: | 50,000 hours for LED |
| Motors: | 1 |
| Colour wheel: | 6 colour (sky-blue, green, yellow, blue, violet, white) |
| Animation wheel: | Twinkle with colour wheel |
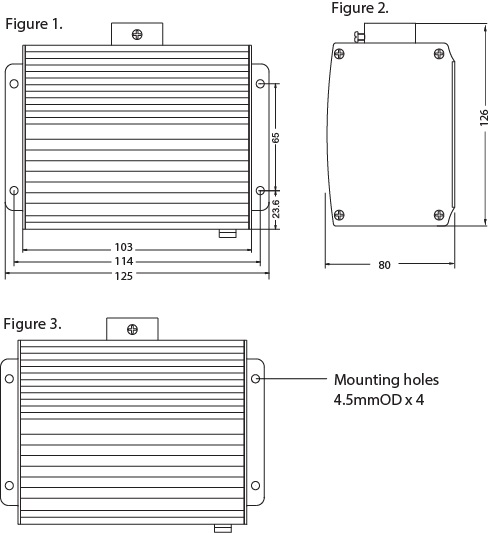
| Physical size (L x W x H): | 125 x 126 x 80 (mm) |
| Gross weight: | 0.6kg |
| IP rating: | IP30 |
| Operating temperature: | 40ºC maximum |
| Harness aperture: | 14mm or 17mm ID |
| DMX512 address: | 255 maximum programmable addresses |
| Radio frequency: | 433Mhz wireless |
| Remote battery type: | A23 |

2. Installation
(1) Installation to be completed by a competent person or licensed electrician.
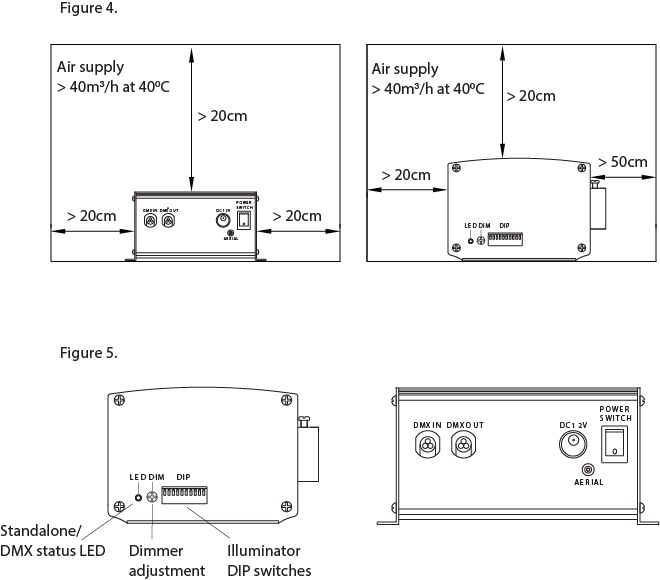
(2) Locate an area where the illuminator will be installed, making sure adequate ventilation is available.
(3) Place the illuminator on a horizontal surface.
(4) Secure the illuminator with fasteners in the allocated slots.
(5) Insert the harness into the illuminator port (as per section 5).
(6) Plug the power supply into a power source.
(7) Turn the power source switch ON.
(8) Operate the illuminator through one of the communication modes (as per section 3).
Notes:
- The illuminator must be accessible after installation for servicing.
- Appropriate ventilation must be provided to ensure that the area of the installed illuminator is kept below the maximum temperature limit, a minimum flow rate of 40m3/h at 40ºC.
- The Illuminator should NEVER be placed into an air-restricted area or sealed enclosure.

3. Communication
There are three independent modes of communication with the 5 watt series illuminator.
(A) DMX512 mode. A DMX512 command is received from a DMX512 controller to operate the illuminator (refer to section 3a).
(B) Standalone mode: The illuminator has a preset function which can control all connected slave illuminators (refer to section 3b).
(C) Wireless mode: Controls illuminator functions via remote control (refer to section 3c)
3a. DMX512 Mode
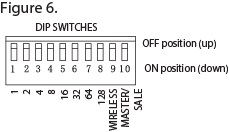
To activate DMX512, set DIP switch 1 to ON position. All remaining DIP switches are to be in the OFF position.
C001: Colour C002: Speed C003: N/A C004: Dimmer/Strobe
The DMX Status LED will blink if it is connected to a master controller or illuminator.
| Channel | Value | DMX Function |
| 001 | 000 003 054 075 096 117 128 160 180 200 220 255 |
White Sky blue Green Yellow Blue Violet Extreme 6 colour/twinkle rotation Very Fast 6 colour/twinkle rotation Fast 6 colour/twinkle rotation Medium 6 colour/twinkle rotation Slow 6 colour/twinkle rotation Slowest 6 colour/twinkle rotation |
| 002 | 000 255 |
Fast scene change Slow scene change |
| 003 | 000 | N/A |
| 004 | 000 034 064 094 127 128 200 255 |
Lamp OFF 20% Bright 40% Bright 75% Bright 100% Bright Fast strobe Medium strobe Slow strobe |
For controlling via RS232 serial protocols, or other Home Automation systems, refer to the LightEFX user manual "FOC-DMX-SERIAL - Serial to DMX interface module" which can be downloaded from here
3b. Standalone Mode
Standalone illuminators will need to be configured by LightEFX.
The powering ON and OFF of the illuminator will need to be done manually via other means i.e.. Light switch
The wireless mode will need to be disabled.

3c. Wireless Mode
To activate the Wireless Mode, set DIP switches 9 and 10 to ON position.
All remaining DIP switches to be in the OFF position (refer to Figure 6.).
| Value No. | Remote Control Functions |
| 01 02 03 04 05 06 07 08 09 10 11 12 13 14 15 16 |
White Sky blue Green Yellow Blue Violet White, Sky blue, Green, Yellow, Blue, Violet - 2 second pause. White, Sky blue, Green, Yellow, Blue, Violet - 4 second pause. White, Sky blue, Green, Yellow, Blue, Violet - 6 second pause. 6 Colour and twinkle rotate speed 1 6 Colour and twinkle rotate speed 2 6 Colour and twinkle rotate speed 3 6 Colour and twinkle rotate speed 4 6 Colour and twinkle rotate speed 5 6 Colour and twinkle rotate speed 6 6 Colour and twinkle rotate speed 7 |
Operating remote control:
Turn ON and Off; Press ![]()
Selecting a function; Press![]()
Choose function by adding remote numbers to equal desired Value No.
(Eg: press ![]() button 2 times on the remote to equal Value No. 10).
button 2 times on the remote to equal Value No. 10).
Press ![]() to save function to memory
to save function to memory
Dimming; Press ![]() Press
Press ![]() for brightness or
for brightness or ![]() for low intensity.
for low intensity.

4. Communication Wiring
Connection master and slave illuminators for DMX512 external controller.

Connection master and slave illuminators for Standalone Mode.

Connection master and slave illuminators for Wireless Mode.

DMX512 communications extension cable.

5. Harness Installation
(1) Cut the fibre cables to length using the appropriate harness size as per the table below:
| Harness Size | Fibre Optic Size (0Dmm) | Approx. Fibres' Per Harness No. |
| 14 | 0.50 0.75 1.00 1.50 |
550 250 150 50 |
| 17 | 0.50 0.75 1.00 1.50 |
850 400 215 80 |
(2) Peel off 100mm of PVC jacket (be careful not to cut into the fibre optic cores.)
(3) Unscrew the cable gland and insert fibre cores into the harness, so that the fibre cores protrude through the harness opening.
Tighten the cable gland to secure the fibre cables from moving.
Using a hot knife, cut through the protruded fibre cores making it flush with the harness.
(4) Insert the harness into the illuminator port and tighten he port screw using a screwdriver.

6. Maintenance
(1) Turn off and remove the power cable from the power source.
(2) Vacuum dust build-up around the grill and port areas.
(3) All other servicing is to be carried out by an authorised service agent.
7. Troubleshooting
All servicing is to be carried out by an authorised service agent.
| Error | Possible Cause | Check |
| No light emitting from illuminator. | Power source, power cable or electrical fault harness screwed in (remove and check). Illuminator switch in OFF position. LED is set to the lowest power setting. Colour wheel is not synchronising. Overheated. Blown fuse. DMX512 lost communication. |
Call electrician. Remove harness and check light. Disconnect mains power, open enclosure and check switch. Set wireless remote "DIM" and "7." DMX512 Channel not set correctly. Re-power the illuminator and check if the colour wheel rotates one full rotation. Cool down for 15 mins prior to applying power. Relocate the illuminator to a cooler environment. Check and replace if necessary. Check DMX512 or the automation controller is operating, then re-power the illuminator. |
| Wireless remote not functioning. | Flat batteries. Distance to illuminator. Illuminator in DMX512 Mode. Wireless remote disabled. |
Replace remote control batteries - (A23 battery type). Reduce remote to illuminator distance. Call service agent. Call service agent. |
| No colour changes. | Fibre optics inserted too far into harness. Program function not set via remote. DMX512 value not set to DMX512 channel. Stepper motor malfunction. |
Remove harness from the port screw, and check if the fibre optics are flush to the harness. Set wireless remote press “PRO” then “1” and “0.” DMX512 Channel not set correctly. Re-power the illuminator and check if the colour wheel rotates one full rotation. |
| DMX512 commands not functioning. |
Channel address not correct. Channel value not correct. Wiring connection. |
Check if sending correct DMX512 channel. Check if sending correct DMX512 values. Check DMX512 communication cables. |